About this article.. and about you.
Admittedly RCFlightPath originally stepped away from RotorFlight during its early development due to the flight characteristics and predictability differences from the traditional flybarless systems, so we paused our evaluation and continued relying on the proven legacy platforms since that time.
Fast forward to today (Aug 2026) and with the release of RotorFlight v2.3, we revisited the technology - and the difference is remarkable. The latest version delivers a level of stability, consistency, and tuning sophistication that finally aligns with what experienced pilots expect. RotorFlight has matured into a genuinely capable modern FBL system, and we're now integrating it into our training and test platforms with confidence.
Forward
The audience for this article is for intermediate to advanced 3D RC Helicopter pilots.
You might reconsider proceeding unless you can find that:
- you are willing to understand and adapt to complex flight control systems as well as analyze and articulate behavior response.
- you have the patience to apply methods that will require time consuming both trial-and-error AND process-of-elimination methods
- you require unparalleled performance in flight control systems for advanced and aggressive 3D RC Helicopter maneuvers.
- you have a coach or guide to help you understand PID control theory so you can quickly understand the sequence, tuning methods involved as well as what flight characteristics and behavior to look for.
If you're still here..
Then you've realized Rotorflight is for you based on the conditions outlined above. So with that said, Let's get to work.
NOTE: This article is not to help pilots configure RotorFlight. The core focus of this article is TUNING with the particular focus on the following (note that this list is in a stepped sequence a tuner should follow):
-
Master the Proportional Muscle (P-Term)
Begin by raising the P-term to inject responsive authority until your stick movements feel crisp and connected. Push it upward until the mechanics react instantly, watching for any high-frequency buzz that signals you have reached the physical limit of the rotor disc.
-
Balance the Damping Brake (D-Term)
Introduce the derivative term to act as your anticipatory brake and shock absorber. Dial in D-gain to smoothly catch the kinetic energy of a fast stop, ensuring the aircraft locks onto the target instantly without bouncing back, ringing, or overshooting.
-
Lock Attitude with the Integral Anchor (I-Term)
Deploy the I-term and manage your frequency cutoffs (like I-Term Relax) to eliminate long-term drift against external forces like gravity and crosswinds. Keep the relax thresholds wide enough so your high-authority integrator stays engaged on the stops, resulting in a dead-flat, rail-like finish.
Before we begin..
"Telling" a robot what to do or a helicopter "how to fly" is not as simple as you might think it is. One might think, "it should just do it.." where in fact it is a challenge to find the right combination of numerical parameter values to "tell" a computer w/servos as movement actuators exactly how that movement should be.
Changes in the mechanics or physics of your helicopter can dramatically or even subtly change your tune. Be cognizant of any changes that could affect the behavior of your aircraft. The following list should be reviewed and addressed before beginning.
- Mechanical changes can affect your tuning: When changing dampeners, pitch control arm lengths, blades (brand and/or length), weight (ie; heavier/lighter battery), and even CG, can dramatically affect your tune.
- Headspeed: The simple change in a higher or lower headspeed than what you started with can make your original tune off.
- Bent Parts: The introduction of higher than usual vibration can throw off your tune. This can occur after a crash or hard landing that may have bent any shafts causing irregular vibrations that would now confuse the flight controller.
Understanding the P/D relationship
The P-Term
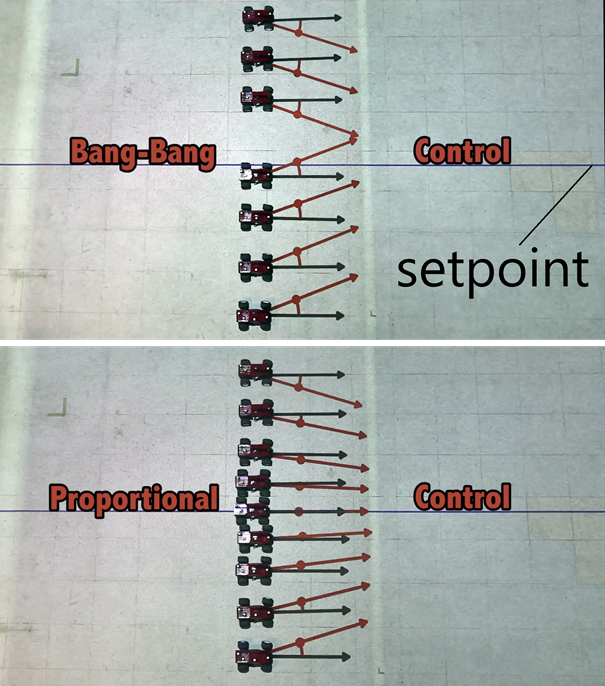
In this slide, we see how the "P" or proportional term was derived. Here we another control system called "Bang-Bang" control. In comparison, the proportional control model right below it.
Notice how the P-Term is higher when the vehicle is further away from the setpoint where on the bang-bang method, the term is constant no matter how far away from the setpoint you are.
The D-Term
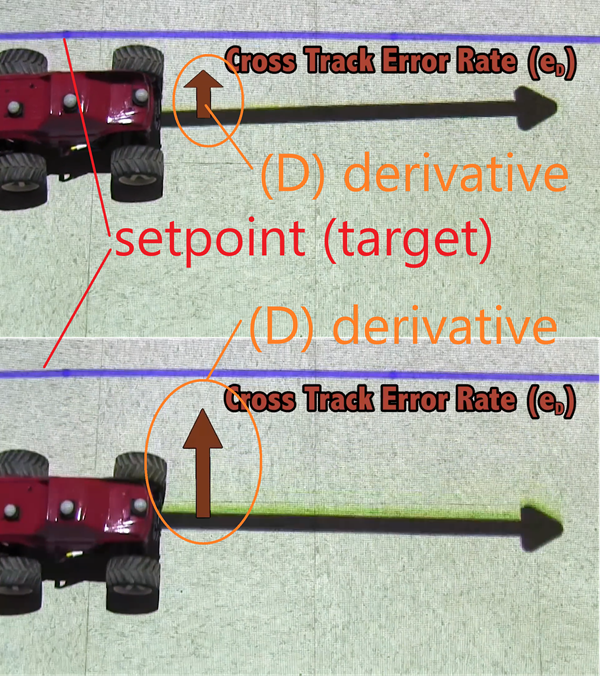
The D-Term or derivative term, officially would be described as the rate of change of error that contributes to the output..
WTF does that mean? Well - here's a simpler analogy where the driver of a car anticipates how much pressure he/she needs to stop at a target line based on their current rate of speed and distance from that line.
Putting it all together
Think of P as your accelerator pedal and D as your shock absorber or brake.
Looking at the P/D ratio—how much "push" you have compared to how much "braking" you have—is the secret sauce to making things move right. Here is why and how we look for that ratio.
-
P (Proportional) is your muscle:
It looks at how far away you are from your target. The further away you are, the harder it pushes you toward it. But if P is too high all by itself, you get excited, overshoot the target, swing past it, and bounce back and forth like a spring.
-
D (Derivative) is your brain's anticipation:
It looks at how fast you are approaching that target. If you are rushing toward the target way too fast, D kicks in to slow you down ahead of time so you don't crash into it.
If you don't balance them—meaning if your P/D ratio is wrong—the system either feels lazy and loose (too much brake, not enough push) or spastic and jittery (too much muscle, not enough brake).
Finding the right ratio means finding the exact sweet spot where the push gets you to the target instantly, and the brake stops you dead in your tracks without a single wobble.
The I-Term
Once you've established your P/D ratio (and intensity), let's look at how the "I" or integral term steps in to finish the job that P and D leave behind. While P handles the muscle to get you moving and D handles the anticipation to stop you cleanly, neither of them remembers the past or cares about stubborn, ongoing forces like a crosswind pushing against your helicopter or gravity pulling down on a hovering drone.
Imagine you are holding a heavy grocery bag out to your side. Your muscles pull it up to the right height (that's P), and you stop your arm from swinging past your shoulder (that's D). But if you just relax and hold it there for five minutes, your arm starts to get tired and slowly drifts downward.
The I-Term is your stubborn memory muscle. It looks at the accumulated error over time—adding up every little bit of drift you failed to fix. If the aircraft is even a tiny fraction off target for more than a split second, I-Term says, "Hey, we are still not quite there!" and slowly ramps up its pressure until that persistent error is completely crushed to zero.
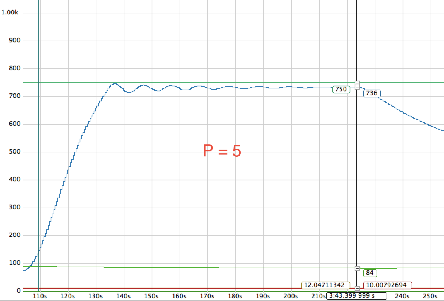
Note the following graph: It explicitly shows the system output over time reacting to a step input (setpoint change). You can see the initial response curve, how it approaches the target, and how an integral component eliminates the steady-state offset over time compared to a proportional-only approach.
Putting it all together with I
Think of I as your anchor or your persistent hand holding position against a steady wind.
-
P gets you to the target fast. Tuning this correctly will give the craft a responsive feel. You will be raising this term until you notice an oscillation. However, once you've reached that point, don't just back the term value down - rather, tune the D-term to provide the correct amount of dampening to fix the oscillation.
-
D keeps you from overshooting or bouncing. As mentioned, imagine "cranking" up the P-term high enough to where you get an oscillation when a maneuver stops or completes. This term fixes that.
-
I makes sure you actually stay put when outside forces try to push you away over the long haul. This is the tune that most pilots will refer to as "that locked in feel"
If your I-Term is too low, your helicopter might feel crisp on the stops, but it will slowly drift or get blown around when hovering in a breeze. If your I-Term is too high (or fighting the wrong settings, like a tight relax cutoff), the aircraft can feel spongy, sluggish, or like it's second-guessing its own stops with a tiny rubber-band creep at the end.
PIDs All Together Now!
Tuning a helicopter or a robot isn't about memorizing arbitrary numbers or fighting your flight controller; it's about conducting an orchestra of forces. When you move your sticks, you aren't just telling a servo to twitch—you are giving the flight controller a moving target, called a setpoint. The tiny computer inside the aircraft instantly compares your desired target against what the helicopter is actually doing, calculating the difference as an error.
To turn that error into smooth, lifelike flight, the flight controller blends its three core tools into a seamless harmony:
-
P (Proportional) is the muscle: It looks at the present moment, sizing up how far away the aircraft is from your command and pushing hard to get it there instantly.
-
D (Derivative) is the brake: It looks ahead at the speed of the movement, applying clever, anticipatory damping to catch that muscle right at the target line so it never overshoots or bounces like a spring.
-
I (Integral) is the memory: It looks backward over time, tallying up stubborn, invisible forces like a sudden crosswind or gravity, and firmly anchoring the helicopter's attitude so it stays dead-locked on position.
By balancing these forces—and giving them enough breathing room through smart settings like I-Term Relax—you stop fighting the computer and start shaping the aircraft's personality. The numbers you type into Rotorflight become a direct translation of your intent, turning cold electronics into a responsive, unified extension of your own hands on the sticks.
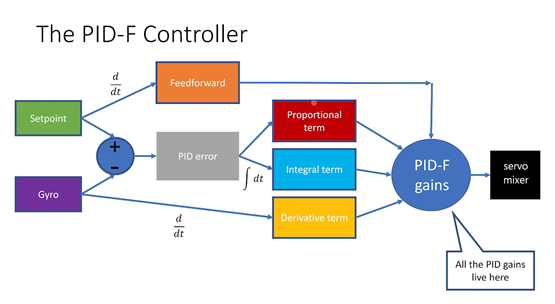
From Orchestra to Architecture: How the PID-F Controller Works
Now that you know what each individual player does—the muscle (P), the brake (D), and the memory (I)—let's look at how the flight controller actually wires them all together in real-time. Think of this diagram as the control room inside your helicopter or robot, where every single command from your sticks is processed through a precise sequence before ever reaching the servos.
Here is how the journey unfolds step-by-step:
-
The Starting Line (Setpoint vs. Gyro)
When you move your transmitter stick, you create a new goal called the Setpoint (the green box). At the exact same time, the aircraft's internal sensors—the Gyro (the purple box)—are reporting what the vehicle is actually doing right now.
-
Finding the Difference (PID Error)
These two values meet at the circular plus/minus junction. The controller subtracts your actual movement from your desired goal to calculate the PID error (the gray box). This error is simply the gap between where you want to be and where you are.
-
Splitting the Work
The calculated error is then split and sent simultaneously to our three core friends:
- Proportional term (P): Looks straight at the error size to push the system toward zero.
- Integral term (∫ dt): Integrates the error over time to crush stubborn, lingering offsets.
- Derivative term (d/dt): Measures how fast the gyro data is changing to provide clean damping.
-
The Fast Lane (Feedforward)
Notice the Feedforward orange box at the top? Unlike P, I, and D which wait for an error to happen, Feedforward looks directly at your stick movement (d/dt of the Setpoint) and shoots a direct predictive push straight to the mixer. It is the secret weapon that makes stick snaps feel instant and alive before the error even has time to grow.
-
The Final Mix (PID-F Gains & Servo Mixer)
All of these calculated forces—the muscle, the brake, the memory, and the predictive push—flow into the big central circle labeled PID-F gains (where all your custom tuning numbers live). They get blended into a single, cohesive electrical signal that tells the servo mixer (the black box) precisely how to move the control surfaces.
In short, your flight controller is running this entire loop thousands of times every second—comparing, calculating, damping, and correcting—turning a stream of numbers into a single, fluid extension of your will.
Can we get onto tuning already!
Well, like we said - PID Tuning is not for the weak or impatient.. but enough about that..
Below are the best tuning resources we have to offer isolated within their own pages. Start w/the 1st one and work your way through.


References Section
Here's a simple table of analogies to help you understand what PIDs are and how they work.
PID Analogy Table
| Explanation | P-Term | I-Term | D-Term |
|---|---|---|---|
| Official | Determines how aggressively the system reacts to errors. If it's too low, the aircraft might not reach the desired rate; if too high, it might overshoot and cause oscillations. | Handles longer-term errors (drift). If the I-term is too weak, the craft might fail to maintain a steady rate over time, leading to slower response or drift. | Provides damping, helping smooth out rapid changes. If the D-term is too low, the system might overshoot or oscillate, affecting the perceived rotation rate. |
| Simplified | The P-term is like the "muscle" of the system. It works to fix the error as soon as it sees something wrong. If you're steering a car and you're drifting off course, P makes quick corrections to get you back. If it's too strong, though, you might end up zig-zagging because it's trying too hard to fix every little error. | The I-term is like your "memory." It helps fix slow, long-term problems. If the car keeps drifting to one side over time, I-term remembers the drift and gradually nudges the car back to where it should be. If it's too strong, though, you could see slow, wavy movements because it's constantly trying to fix accumulated errors. | The D-term is the "smooth operator." It helps slow things down to avoid overshooting. When you stop turning the car, D-term helps make sure you don't swing too far the other way. If it's too weak, the car might overshoot its turns; if it's too strong, the car might slow down too much or feel unresponsive. |
| Summary | Fixes errors immediately, but too strong can cause over-correction. | Corrects long-term drift, but too strong can cause slow wobbling. | Smooths out fast changes to prevent overshoot, but too much can make things sluggish. |
| Car Analogy | The P-term is like your gas pedal. If you want to speed up and you're not going fast enough, you press the gas pedal harder. The harder you press, the faster you get to your target speed. But if you press too hard, you might overshoot and have to hit the brakes. If you don't press enough, you won't get there fast enough. | The I-term is like your car's cruise control. If you've been going slower than you should for a while, cruise control gradually adds more gas to fix it. It remembers how long you've been off and tries to get you back up to speed. If it's too aggressive, the car might constantly speed up and slow down, never quite settling in. | The D-term is like your brakes. When you're getting close to your target speed, you lightly tap the brakes to slow down so you don't overshoot. If your brakes are too strong, you'll slow down too early and feel like you're never reaching your target. If they're too weak, you might zoom past your target and need to correct. |
| Aileron (Aircraft) | Controls how aggressively the aircraft rolls. If too high, it can cause overcorrection, leading to oscillations in roll. If too low, the roll feels sluggish or unresponsive. | Corrects long-term roll drift, helping the aircraft maintain a steady bank. If too high, it causes slow oscillations. | Smooths out fast roll movements. If too low, the roll can overshoot; if too high, the roll feels sluggish. |
| Elevator (Aircraft) | Controls how sharply the aircraft pitches up or down. If too high, the aircraft will oscillate in pitch. If too low, the pitch response will feel slow. | Corrects gradual changes in pitch (such as drift during straight and level flight). If too high, it causes slow, wavy movements. | Helps smooth out fast pitch changes, reducing the chance of overshoot. Too low, and the pitch overshoots; too high, and it feels slow to respond. |
| Rudder (Aircraft) | Controls how aggressively the tail moves left or right. If too high, it can cause oscillations in yaw (tail wag). If too low, yaw corrections feel sluggish. | Keeps the yaw axis steady over time, helping to correct for drift. Too high can cause slow tail oscillations. | Damps fast yaw movements, reducing tail overshoot. If too low, the tail swings too much; if too high, the tail feels unresponsive. |
A sample of saving your configs to a file.
# Example CLI command or settings block
dump all
exit
Useful RotorFlight Links
Watch this device created to help you understand the effects of each of the PID parameters.
Adjust the P-term, I-term, and D-term dials to see how the setpoint reacts.